Once you have a file attached to your event, either from a Live Recording, or an uploaded file, you may wish to remove any extra footage you have at the start or the end of your file. Our trim tool makes quick work of this and still preserves your original file. Your original file is not edited.
Quick Take
1. Under your media is a button labeled “Show Trim Controls”. Select it to expose the tools
2. Select the start and end times for your file and click the “Trim” button.

Full Walkthrough
You can trim from the start or the end of your media. The time in the green box shows where you want your media to start and the red box shows where you want the media to end. The rest of the controls are all to assist you in entering that information quickly.
Trim Controls
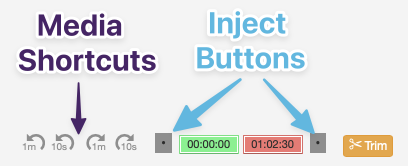
- Media Controls
- These allow you to easily navigate your media by jumping you forward or backwards in 10 second or 1 minute increments.
- Inject Buttons
- To inject the current time of the media player into either the Start or End of where you want to trim your media.
Example
- Play your media file in the player. Using the player’s play bar, or the media shortcuts, advance until you find where you want your media to start. Press the pause button, if needed.
- Select the Inject Button next to the green Start field. The current time of the player will be inserted.
- Move your media towards the end of your file until you find where you want it to stop. Press the pause button if needed.
- Select the Inject button next to the red Stop field. The current time of the player will be inserted.
- Press the Trim button to trim the file to the settings you just entered.
You Can Redo
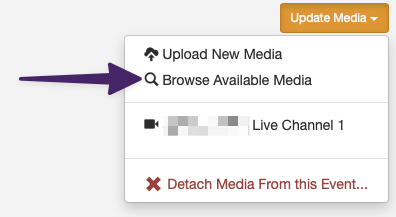
If you are not happy with the trim, not to worry, your original file is preserved. You can always go back and re-trim if you need to. Simply select the “Update Media” button on the far right and you’ll see your original file in the “Browse Available Media” tab.
Advanced: Creating A Clip
A more advanced use case for the trim tool is when you wish to create a clip from a longer media file. For example, there was a presentation in your meeting and you’d like to create a clip to share on your Socials.
To accomplish this, you will be creating a new file to download and then re-attaching your original file. Here’s the step by step guide:
- Make a note of the original file name. This is important, because you will need to re-attach the original file when you’re done.
- Select the start and stop points for the clip that you wish to create and trim the file like normal.
- When complete, you will have the clip attached to your event. You have two options with this new file:
- Download – click the download button to save it to your computer.
- Un-Attach & Publish – with this method, you can publish just the clip to your CHAMP account as a new Event. Note: this will happen automatically with the next step
- Re-attach your original file by selecting “Update Media” and selecting your original file.
Common Questions
- Can I trim from the middle of a file?
No. We do not offer that feature within the CHAMP software. Since you are most likely working with public data, trimming out media from within a file is considered editing. Editing the content of a public meeting is not best practices for open meeting laws. - I know but it’s really important, what are my options?
- Download the file – with the file on your computer you can use any software you wish to use to make whatever changes you need to make.
- Contact Support – we are always here to help, simply reach out and we’ll see if we can address the problem.
- Can I stitch two files together?
Not right now. If you have two files that you need to combine, Contact Support. We’re happy to help.